

Design the pack around the complete sellable set
Tableware set export packaging should control every component from the retail unit to the master carton. Buyers need a confirmed bill of materials, defined contact points, an insert or restraint plan, verified packed dimensions, clear packout instructions and an approved physical sample. Packaging is ready for export only when product, artwork, component count and carton configuration refer to the same SKU revision.
A multi-component tableware set is not one object in a box. It can combine a lunch container, lid, gasket, divider, bowl, cup, utensils, pouch, bag, leaflet, retail carton and protective materials, each with different surfaces and movement risks. Packaging decisions therefore affect product presentation, component count, packing labor, packed dimensions and the buyer’s ability to inspect the final SKU.
From the factory side, packaging problems usually begin before the carton is made. A product revision changes but the insert drawing does not; an accessory is added without updating the bill of materials; or a buyer approves artwork before the finished set has been packed physically. The carton then becomes the place where unresolved product decisions collide.
This guide explains how importers, retailers, distributors and private-label brands can diagnose those risks early. It does not prescribe one universal material or carton grade, and it does not substitute for project-specific transit testing, labeling review or freight planning.
Diagnose the tableware set export packaging brief first
Start with the final sellable SKU, not a generic product list. Identify every component, quantity, orientation, finish and variant that must be packed together. If one set includes two bowls but another includes one bowl and a cup, treat them as different packout configurations even if they share the same lunch box.
Tableware set export packaging needs a controlled BOM
The packaging bill of materials should connect product parts with packaging parts. List the container, lid, divider and utensils alongside the pouch, insert, sleeve, carton, labels and leaflet. Give each item a revision or supplier reference so that a packout sample cannot quietly combine parts from different stages.
Record critical product facts that influence packaging. These include finished dimensions, weight, hard or soft contact surfaces, decoration areas, protruding latches, removable parts and any surface that should not rub another component. Mark which measurements are confirmed on a physical sample and which remain provisional.
State the sales channel and destination market because they influence presentation and information needs. A retail shelf pack, an e-commerce parcel and a distributor master case may prioritize different access, display and secondary protection decisions. Market-specific labeling content should be reviewed by the buyer and qualified advisers rather than copied from an unrelated product.
Separate product restraint, retail presentation and export handling
Packaging works in layers, and each layer has a different job. The immediate restraint keeps components in defined positions; the retail pack presents the SKU and carries approved information; the inner or master carton groups units for handling. Treating all three as one “box” makes responsibilities and dimensions difficult to control.
The product-contact layer should prevent unwanted movement and direct surface contact where necessary. It may use cavities, folded partitions, sleeves, pouches, tissue or other project-specific elements. The correct choice depends on component geometry, material, finish, unpacking experience, packing method and the buyer’s environmental and commercial brief.
The retail carton must fit the approved packed set rather than an early drawing. Its dieline, opening direction, viewing window if used, insert engagement, artwork and reserved labeling areas should be reviewed together. A carton that looks attractive when empty may bow, resist closure or expose a latch after the real components are loaded.
The master-carton layer must be based on the verified retail envelope and chosen unit orientation. Case count, divider arrangement, handling marks and logistics assumptions should refer to the same pack revision. Final carton specification and any validation plan need confirmation for the actual distribution route.
Compare insert options against the product and packing method
An insert is not automatically necessary, and one insert material is not automatically best. The buyer should define what must be restrained, separated, displayed or accessed, then compare practical options. The factory should explain how each option is assembled and loaded, not just provide a material name.
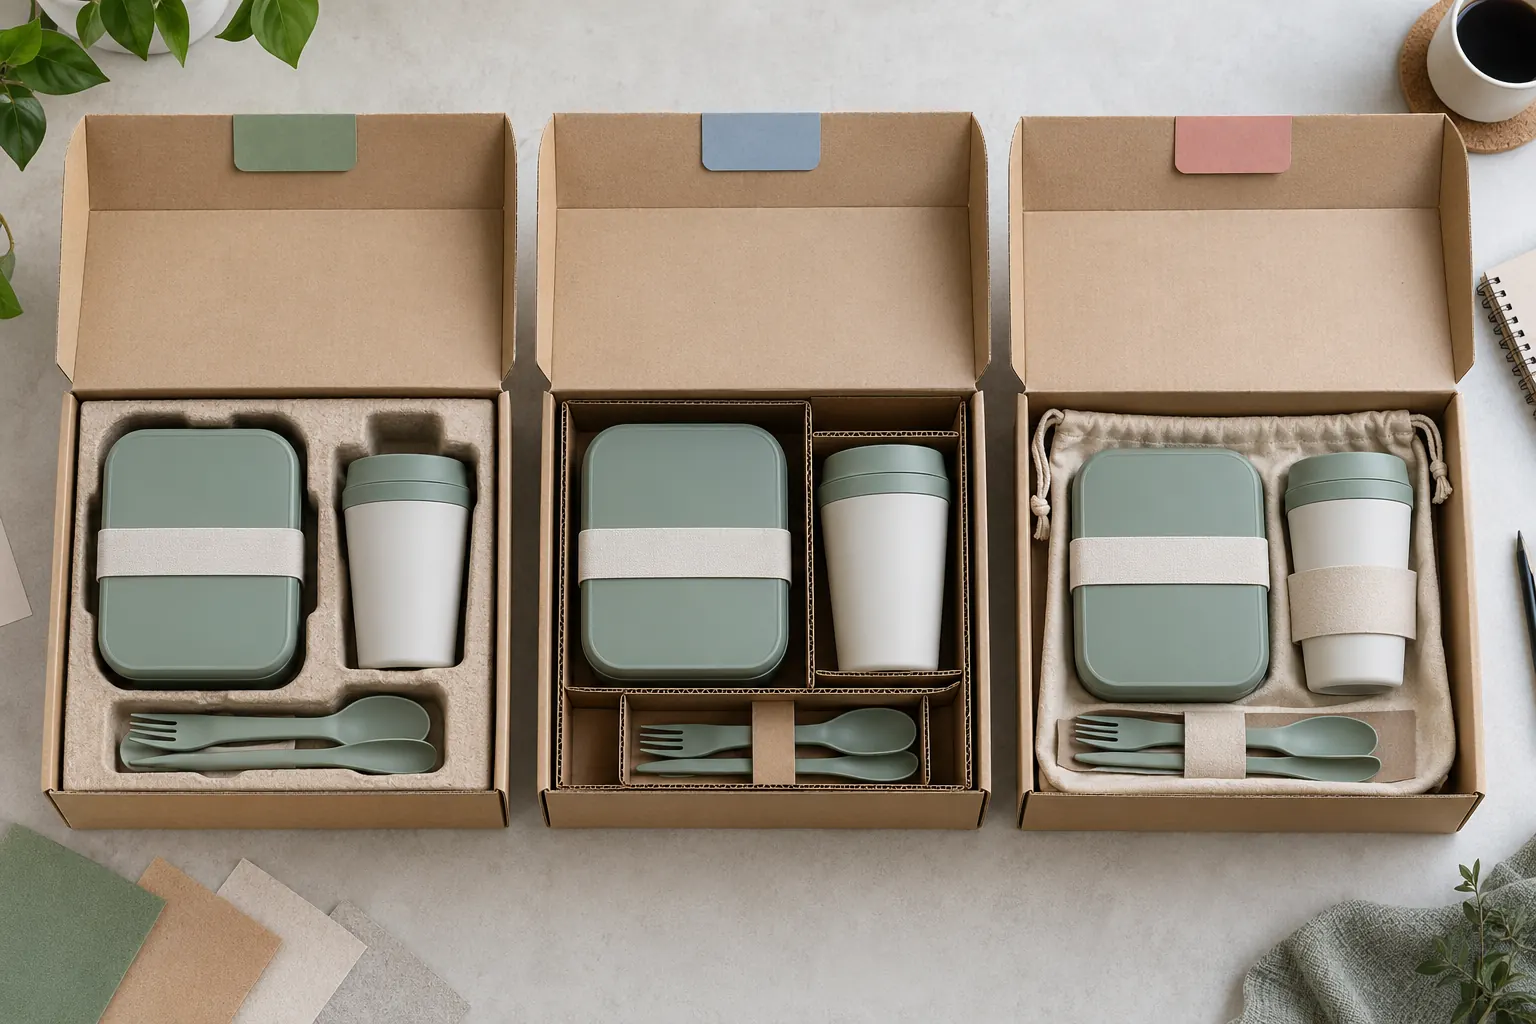
| Insert approach | Potential strengths to review | Questions and constraints | Best used when |
|---|---|---|---|
| Molded-pulp tray | Defined cavities, organized presentation and part separation | Tooling or setup, cavity tolerance, surface contact, moisture conditions and local disposal route | The component geometry and presentation justify a formed insert |
| Folded corrugated dividers | Adjustable cells, flat material options and straightforward carton integration | Assembly steps, cut edges, movement clearance and visual presentation | Parts need separation without a fully formed cavity |
| Paperboard platform or sleeve | Brand surface, guided orientation and compact presentation | Locking method, board strength, fold sequence and access to components | Retail display and controlled placement are important |
| Fabric pouch with restraint | Can become part of the product experience and group accessories | Movement inside the carton, textile quality, closure and component contact | The pouch is an approved component rather than disposable filler |
| Minimal restraint | Fewer packaging parts and simpler unpacking | Whether nesting, sleeves or the product geometry actually prevent contact and movement | The approved set can remain controlled without a complex insert |
Request samples made around the real components. A cavity based on nominal CAD dimensions can still press on a latch, leave a cup loose or hide the decoration when the finished parts arrive. Review removal force and repacking as well as first presentation, especially when buyers expect store staff or customers to inspect and close the pack again.
Ask how the insert is loaded on the packing line. A visually elegant structure may require several rotations or make a missing accessory difficult to see. Packing sequence, component visibility and error detection should be considered before artwork and carton size are frozen.
Prevent missing components with a visible packout system
Multi-component sets create counting risk because small accessories can be nested, bagged or hidden under larger products. A controlled packout map should show every component and its position. It should match the SKU bill of materials, inspection record and carton sample.
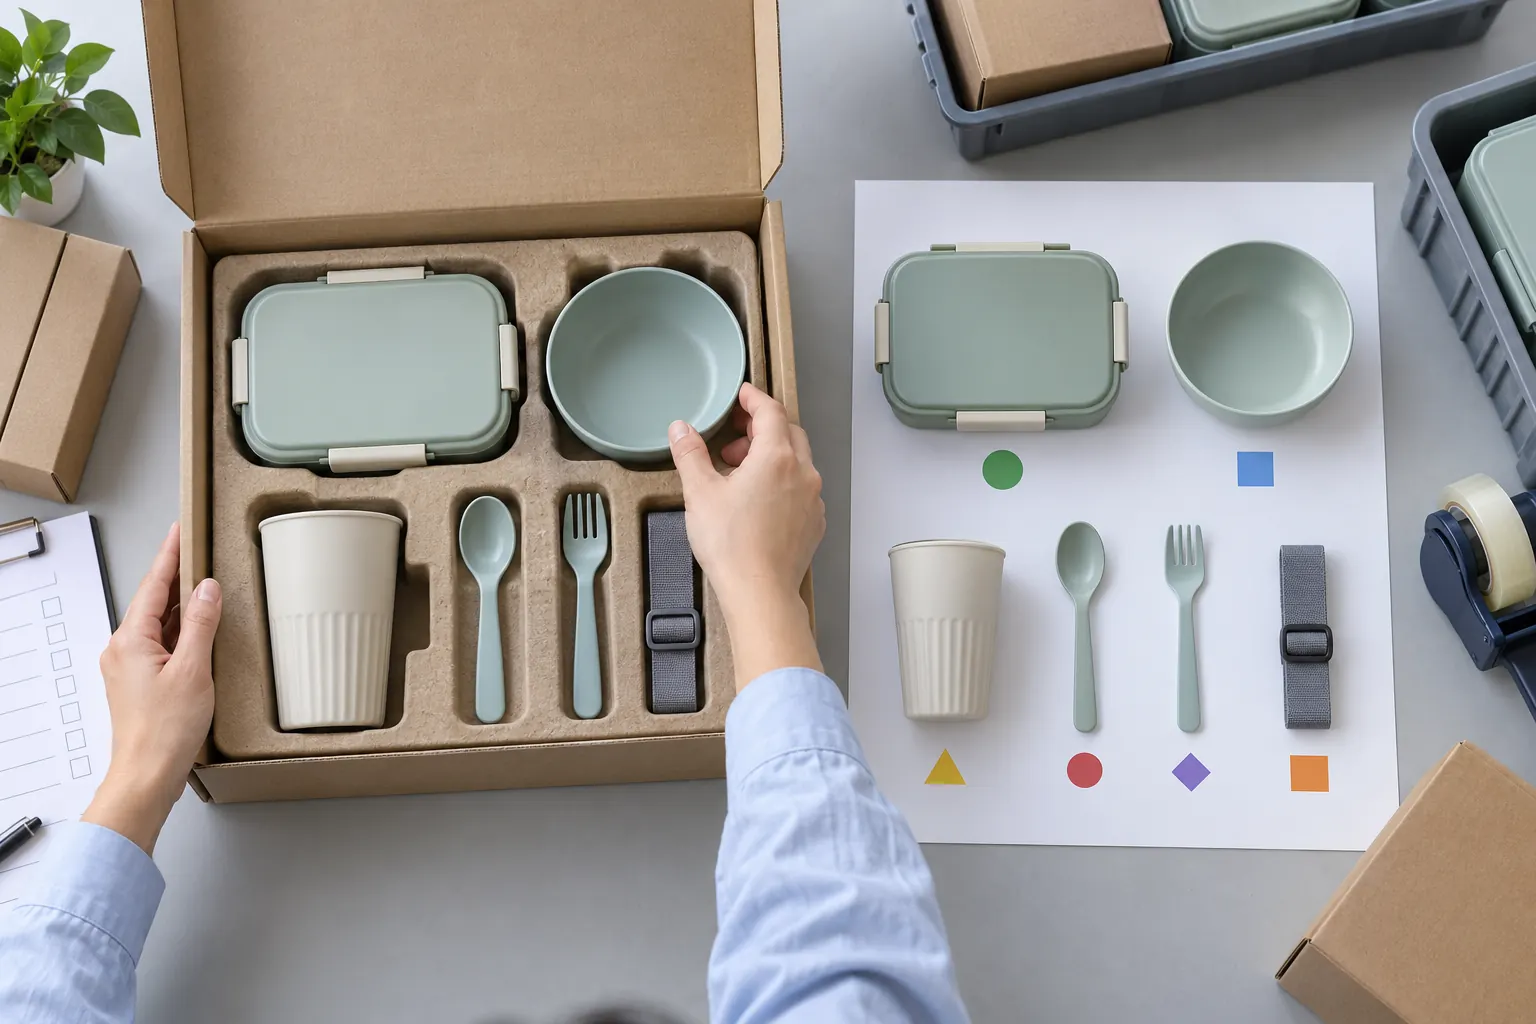
Give each component a visible confirmation point where practical. Utensils can occupy a defined cavity, a strap can be folded to a reference position and a leaflet can have a designated pocket. When components must be hidden, define an intermediate count or scan step rather than relying on final carton appearance.
Different variants should be distinguishable without opening completed cases unnecessarily. Color, component and market variants may need controlled labels, carton marks or staging rules. The buyer should approve the information architecture and ensure it does not create unsupported product claims.
A sample packout should also reveal packing labor and sequence. If the operator must open the lunch box, insert utensils, close four latches, wrap the product, load a cup and then align a sleeve, those actions affect consistency and quotation scope. Confirm what is included rather than assuming that unit price automatically covers every assembly step.
The custom meal kit BOM guide explains how to control product and packaging components across one SKU. Use it with the packout map so purchasing, artwork, packing and inspection teams are working from the same structure.
Verify packed dimensions before approving export cartons
Measure the complete physical retail pack after the product, insert and artwork structure are stable enough for review. Product dimensions alone cannot establish the shipping envelope. Carton seams, flaps, sleeves, handles and protective layers can change the final length, width, height and weight.
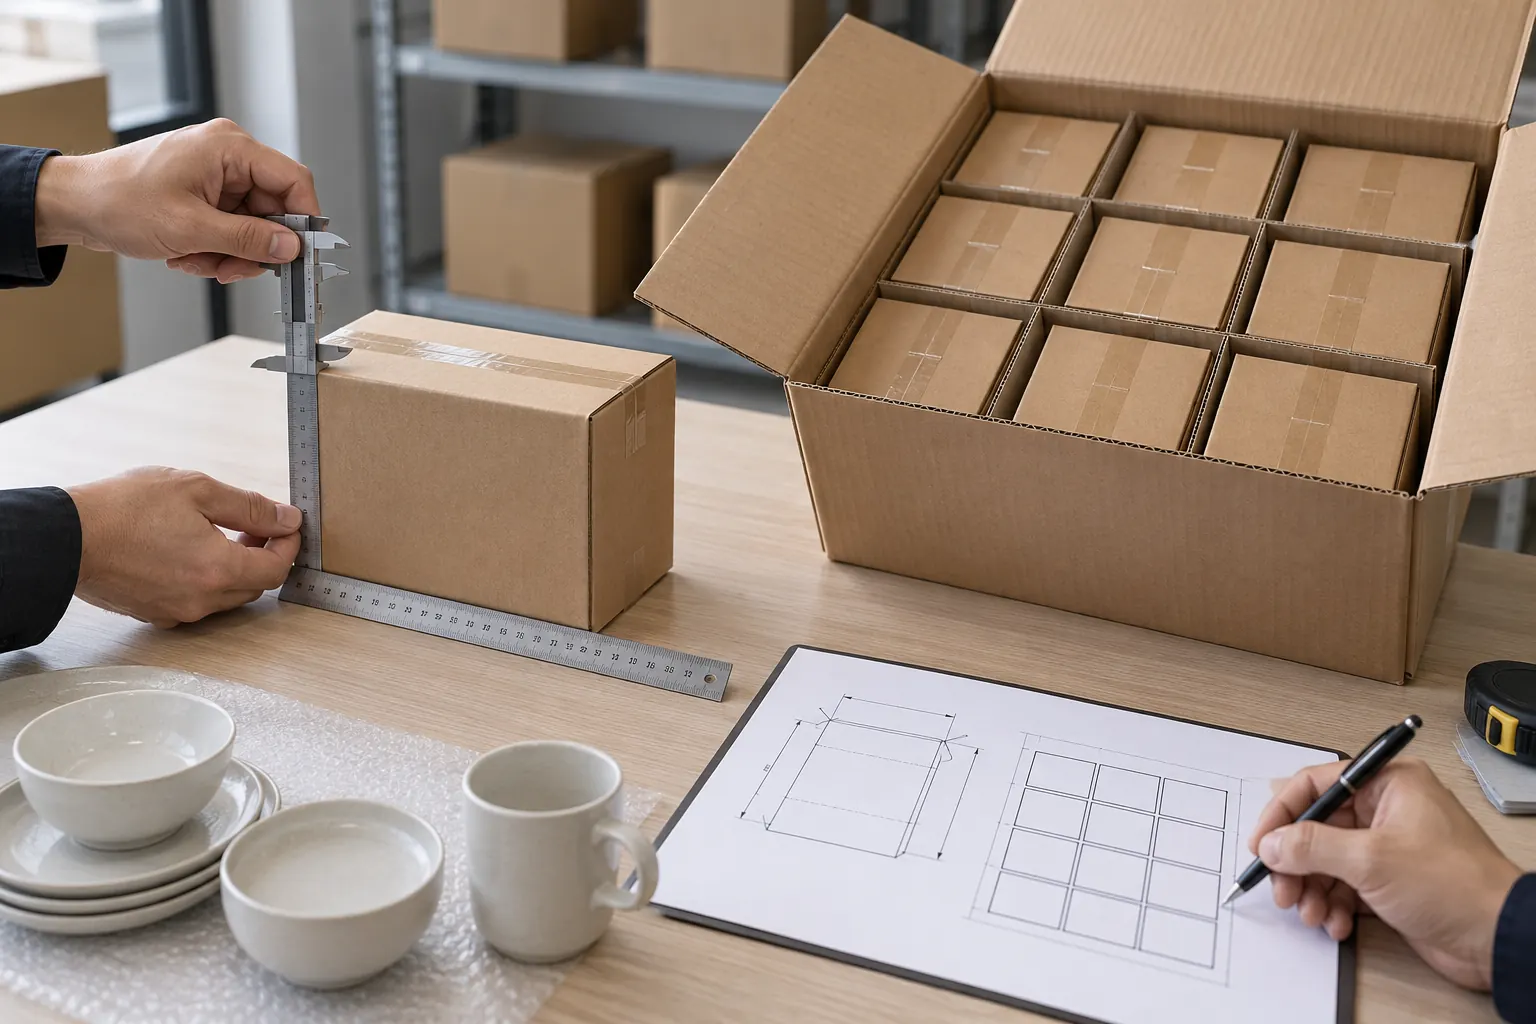
Build the master-carton layout from the verified retail pack. State unit orientation, count per layer, number of layers, divider use and any unused space that requires control. Confirm gross and net weight definitions and keep them tied to the approved component count.
Do not select a carton only by maximizing theoretical unit count. The buyer should consider handling, storage, distribution route, retailer limits and the validation plan appropriate to the project. A denser arrangement can change loading sequence or create contact points that were absent in the retail sample.
The portable dining set packed-dimensions guide provides a detailed measurement framework. Use actual approved samples and record the configuration date, because a new insert or accessory can make earlier calculations obsolete.
Approve packaging as one controlled export configuration
Final packaging approval should include the actual product components, restraint system, retail carton, artwork, labels, leaflet and intended master-carton arrangement. Give the sample a revision and record what is approved, conditional or still open. A printed empty carton is an artwork sample, not an approved export pack.
Keep dielines and artwork under change control. If the buyer changes a utensil, logo size, market statement or insert, review the affected files and dimensions before release. A small component change can alter carton closure, barcode placement or case count.
Define what evidence is needed for the selected route. Depending on market and distribution, the project may require material declarations, packaging specifications, labeling review or an agreed physical validation plan. Do not infer compliance or transit performance from a conceptual image, general supplier statement or different SKU.
Connect the approved pack with incoming, in-process and final inspection points. Inspectors need the component count, approved visual references, key dimensions, packout orientation and decision rules for missing or damaged parts. The meal kit quality inspection guide explains how release checks can follow the controlled SKU.
B2B buyer checklist for export packaging approval
| Check | Question | Why It Matters |
|---|---|---|
| Complete SKU | Does the packaging brief list every product and packaging component by revision? | Prevents an early or incomplete sample from defining the final pack. |
| Contact map | Which surfaces, latches and decorated areas can touch other parts or packaging? | Directs restraint and separation decisions to actual risk points. |
| Insert route | Was the insert compared against component geometry, packing sequence and presentation? | A material name alone does not prove fit or packability. |
| Component count | Can operators and inspectors see or verify every item in the set? | Reduces ambiguity around hidden accessories and variant differences. |
| Retail sample | Has the buyer approved a physically packed carton with final component orientation? | Confirms that product, insert, artwork and closure work together. |
| Packed dimensions | Were dimensions and weight measured from the approved packed configuration? | Supports realistic shelf, case and freight planning. |
| Master carton | Are case count, orientation, layers and dividers linked to the retail envelope? | Keeps outer-carton planning synchronized with the sellable unit. |
| Market information | Who confirms required labels, languages, symbols and claims? | Prevents unsupported or misplaced information from reaching print. |
| Change control | Which product or artwork changes require pack reapproval? | Protects the released configuration when components evolve. |
| Inspection reference | Do packing and inspection teams use the same approved sample and packout map? | Creates one decision standard across production and shipment release. |
B2B buyer FAQ about tableware export packaging
Which insert material is best for a tableware set?
There is no universal best material. Compare the actual component geometry, surface-contact needs, presentation, packing method, commercial scope and end-of-life requirements. Review a physical packed sample and confirm the selected specification rather than choosing from appearance alone.
Can the retail carton be designed before the product sample is final?
Early structural concepts can begin, but critical dimensions and closure should remain provisional. Freeze the carton only after the relevant product, accessory and insert dimensions are sufficiently controlled. Record any dependency so a later product change triggers packaging review.
How should buyers prevent missing cutlery or accessories?
Use a controlled BOM, visible packout map, defined accessory positions and an appropriate count or verification step. Make variants distinguishable and connect the same component list to inspection. Hidden parts need an intermediate control rather than reliance on final carton appearance.
Does a master-carton drawing prove the shipment will perform?
No. A drawing defines structure and dimensions but does not prove performance under a specific distribution route. The buyer and supplier should agree on the appropriate validation plan, acceptance criteria and final configuration. Avoid presenting a conceptual carton as tested evidence.
What information should a buyer send for a packaging quotation?
Send the complete component list, physical or controlled dimensions, target market, sales channel, quantity by variant, presentation direction, artwork status, labeling needs and known logistics limits. State which items are confirmed and which need factory review. Ask suppliers to identify exclusions and assumptions.
When is tableware export packaging ready for production?
It is ready when the approved product revision, insert, carton structure, artwork, labels, packout map, packed dimensions, master-carton plan and inspection references describe the same SKU. Remaining conditions should have owners and release criteria. Project-specific testing and commercial details must be confirmed in writing.
Conclusion: release tableware set export packaging as a system
Reliable tableware set export packaging begins with the complete sellable unit and finishes with one controlled export configuration. The buyer should be able to trace every component from the BOM to its packing position, retail carton, master-carton plan and inspection reference.
Share the selected tableware components, target market, channel, quantity by variant, branding files, presentation direction and logistics constraints when requesting a review. Naike Tableware can then assess packaging options against the actual SKU and clearly identify what still requires sampling or confirmation.